The MG T Series cars have several grease fittings which are really to have oil injected, not grease. The following article describes the conversion of a standard grease gun to an oil gun. This adaptation was created for oiling metal working machinery.
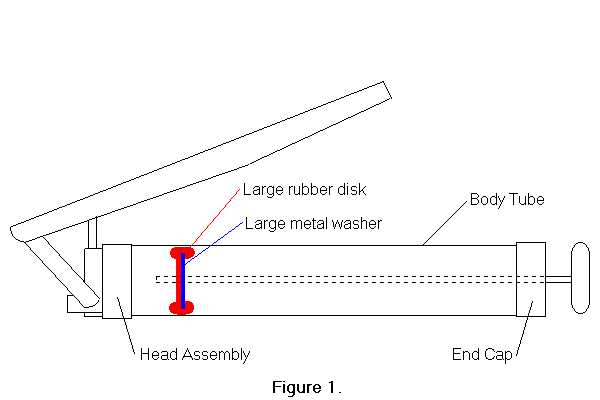
First you will need to buy a good, low-priced lever action grease gun that would use 14 ounce cartridges. The author used a PLEWS model 30-445 available at Canadian Tire for under $20. The gun does not need an air bleed screw in the head assembly (something that usually costs extra). Look inside the tube before you buy the grease gun and check out the plunger. The oil gun described here requires a good large rubber plunger to help seal the hole the plunger rod goes through in the end of the gun (See Figure 1). A grease gun with a rubber washer where the body tube screws into the head assembly is recommended.
Unscrew the end cap from the tube body. Use a hack saw and cut the plunger rod in half to remove it from the grease gun. The rubber disk should slide easily off the rod.
The next step is to attach the rubber disk to this end cap with a bolt, lock washer, washer and nut to seal the hole in the end cap. This may take a little ingenuity on your part, depending on the shape and make-up of the rubber disk in your grease gun. The Plews grease gun has a large metal washer on one side of the rubber disk and some sort of metal cone on the other side of the disk. Discard the metal cone but retain the metal washer. If your grease gun does not have a large metal washer, you will need to furnish one. You are going to put a bolt through the rubber disk from the metal washer side and then slip the bolt through the hole in the end cap so that the bolt sticks through where the plunger used to. Use the largest bolt that will fit through both the rubber disk and the end cap hole. Slip a washer, lock washer and nut on the end of the bolt, but do not tighten it down snug yet (See Figure 2). Next, put plumber's tape around the threads on the tube body and screw the end cap back on, getting as tight as you can with your hands. You should not need to use a pipe wrench. Once the end cap is back on the tube, tighten the nut down so that the rubber disk is compressed up inside the end cap. The compressed rubber disk should seal around the bolt and the hole in the end cap. It will also help to seal the seam between the tube body and the end cap. Do not over tighten the nut or you will destroy the rubber disk. Remember, the oil will not be under any pressure inside the tube (the piston in the head assembly generates the pressure needed to force out the oil).

To finish up the conversion, remove the delivery tube and nozzle from the end of the head assembly portion of the grease gun. Then wrap plumber's tape around all the threads and re-assemble the delivery tube and nozzle. The author replaced the metal delivery tube with a flexible tube on his oil gun. Now you are ready to fill and use.
Hold the tube body capped-end down and fill the tube with the appropriate oil. Screw the piston head assembly back. You will need to hold the oil gun so that the oil flows downward toward the piston assembly located in the head when you use it. Store the oil gun with the nozzle end up.
The original article is at http://www.metalwebnews.com/howto/oilgun/gunconvert.html.
The author's email is .
Originally created: 04/21/96
ADDENDUM
I own one of the little pistol grease guns that takes the 6 inch grease cartridges. I never was happy with it as a grease gun so I converted it to an oil gun. The above instructions are totally applicable except that the bottom doesn't unscrew. It's an excellent size for my MGTD.
29-Aug-2005
ADDENDUM #2
Like Kevin Pinkerton I have replaced the metal delivery tube with a 12"
flexible tube.
17-Jun-2011

Return to OMGTR Home Page
or Technical Index
Last revision: 17-Jun-2011